Hi folks!
We’re glad to announce that you can now add custom image frames to your Pixo instances. To do that, provide a filterFrames function to editor’s configuration:
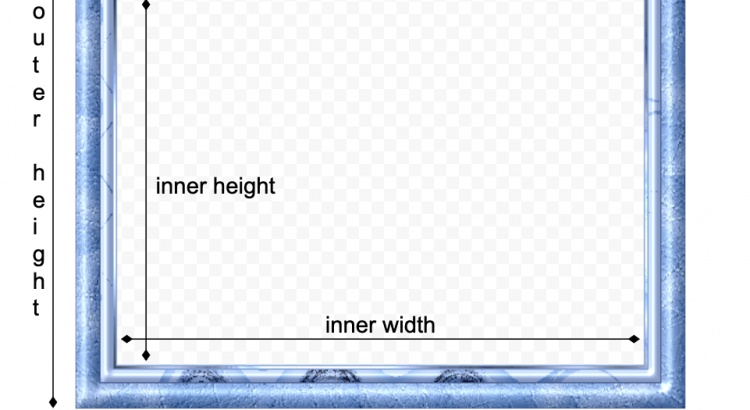
var my_frames = [
  {
     // This is the PNG image that will be used as frame. The larger size the better.
     // Required. The URL must be publicly accessible or CORS-friendly.
     src: 'https://yourdomain.com/path/to/image-frame.png',

     // This is the thumbnail image that will be shown in the property panel.
     // Optional. If missing "src" will be used.
     thumb: 'https://yourdomain.com/path/to/thumbnail-100x100.png',

     // Outer and inner dimensions.
     // Required.
     dimensions: {
        outer: [1920, 1080],
        inner: [1660, 880],
     },

     treshold: .3,
  },
  {
     src: 'https://yourdomain.com/path/to/large-image.png',
     thumb: 'https://yourdomain.com/path/to/thumbnail-100x100.png',
     dimensions: {
        outer: [1920, 1080],
        inner: [1660, 880],
     },
  },
];

var pixo_instance = new Pixo.Bridge({
  apikey: 'abc123xyz000',
  filterFrames: function(stock_frames){
     // replace stock frames with your own
     return my_frames;
     // or, merge them and place your at the top
     return my_frames.concat(stock_frames);
     // or, merge them and place your at the bottom
     return stock_frames.concat(my_frames);
     // or, mix them randomly
     return stock_frames.concat(my_frames).sort(function(){
        return Math.random() - 0.5;
     });
  },
});
Make sure that you follow our frame guidelines when designing and configuring your custom image frames.
Happy coding!